
(I posted this tutorial in pieces, I decided to organize it and put it in one place for your convenience should you wish to make your own puppet. Is fun. *shrug*. The sock pictured is the winning sock of the Ingrid Michaelsock contest here: http://www.ingridmichaelson.com/ingridmichaelsock . I don't think they've done anything with it yet. People keep asking...)
Before you start chopping up socks you'll need some materials: a sock no one is going to miss, a hot glue gun, some light cardboard (cereal boxes work great for this), some acrylic paint, yarn for hair, buttons for eyes and some scrap fabric. Accessories can be made out of polymer clay (Ingrid's ukulele was fashioned out of it), paper, fabric, pipe cleaners or whatever you want. Feel free to change anything up, that's part of the fun.
The first thing I did was start with the mouth since my sock puppet philosophy is geared towards range of expression. Usually the only moving part of a sock puppet is the mouth with some bobbing or turning of the head so I wanted to make sure the mouth was really able to open as wide or narrow as I wanted. I figured I couldn't do much with the eyes or eyebrows so getting the mouth right was very important to me.
I put a folded in half piece of cereal box cardboard between my thumb and all my fingers (in the sock puppet hand stance, if you get what I mean) and guess-timated how wide I wanted the cardboard to be for my hand to be able to fit comfortably. I then marked the cardboard haphazardly while it was still in my clutches so I would know about how wide I wanted it and everything. After that I drew lines from the crease to the haphazard marks and decided on accurate and standard measurements to go on (so I could make a pattern in case I wanted to make more later) and making a grid.

I basically eyeballed the curves. All of that was a complicated way of saying I drew an asymetrical pill shaped thing that's folded in half for the puppet mouth.
This is how it looks in its pill shape.

It looked like this when I was done:

I traced around the mouth insert on some lightweight cardstock, I'll show you what that is for later. After that, I put the sock on and marked the little bit of overhang between my finger and socks with a pencil. I think it was about 1/4 of an inch. I then cut off that little bit (don't do that while still wearing the sock, it's not worth losing any fingers). The sock then looks like this:

Using the handy dandy glue gun, glue the sock onto the cardboard, don't worry too much about glue squishing past the sock fabric, it'll get coverd. When you're done it should look like this:

Now, that copy of the mouth pattern in card stock is for the inner mouth. It'll be too big to comfortably fit inside the mouth of the puppet so it'll need some trimming. I just set it inside the puppet and marked the over hang.

When you trim it down there should be a little bit of sock past all sides like this:

Then, you hot glue fabric onto the card stock like so:


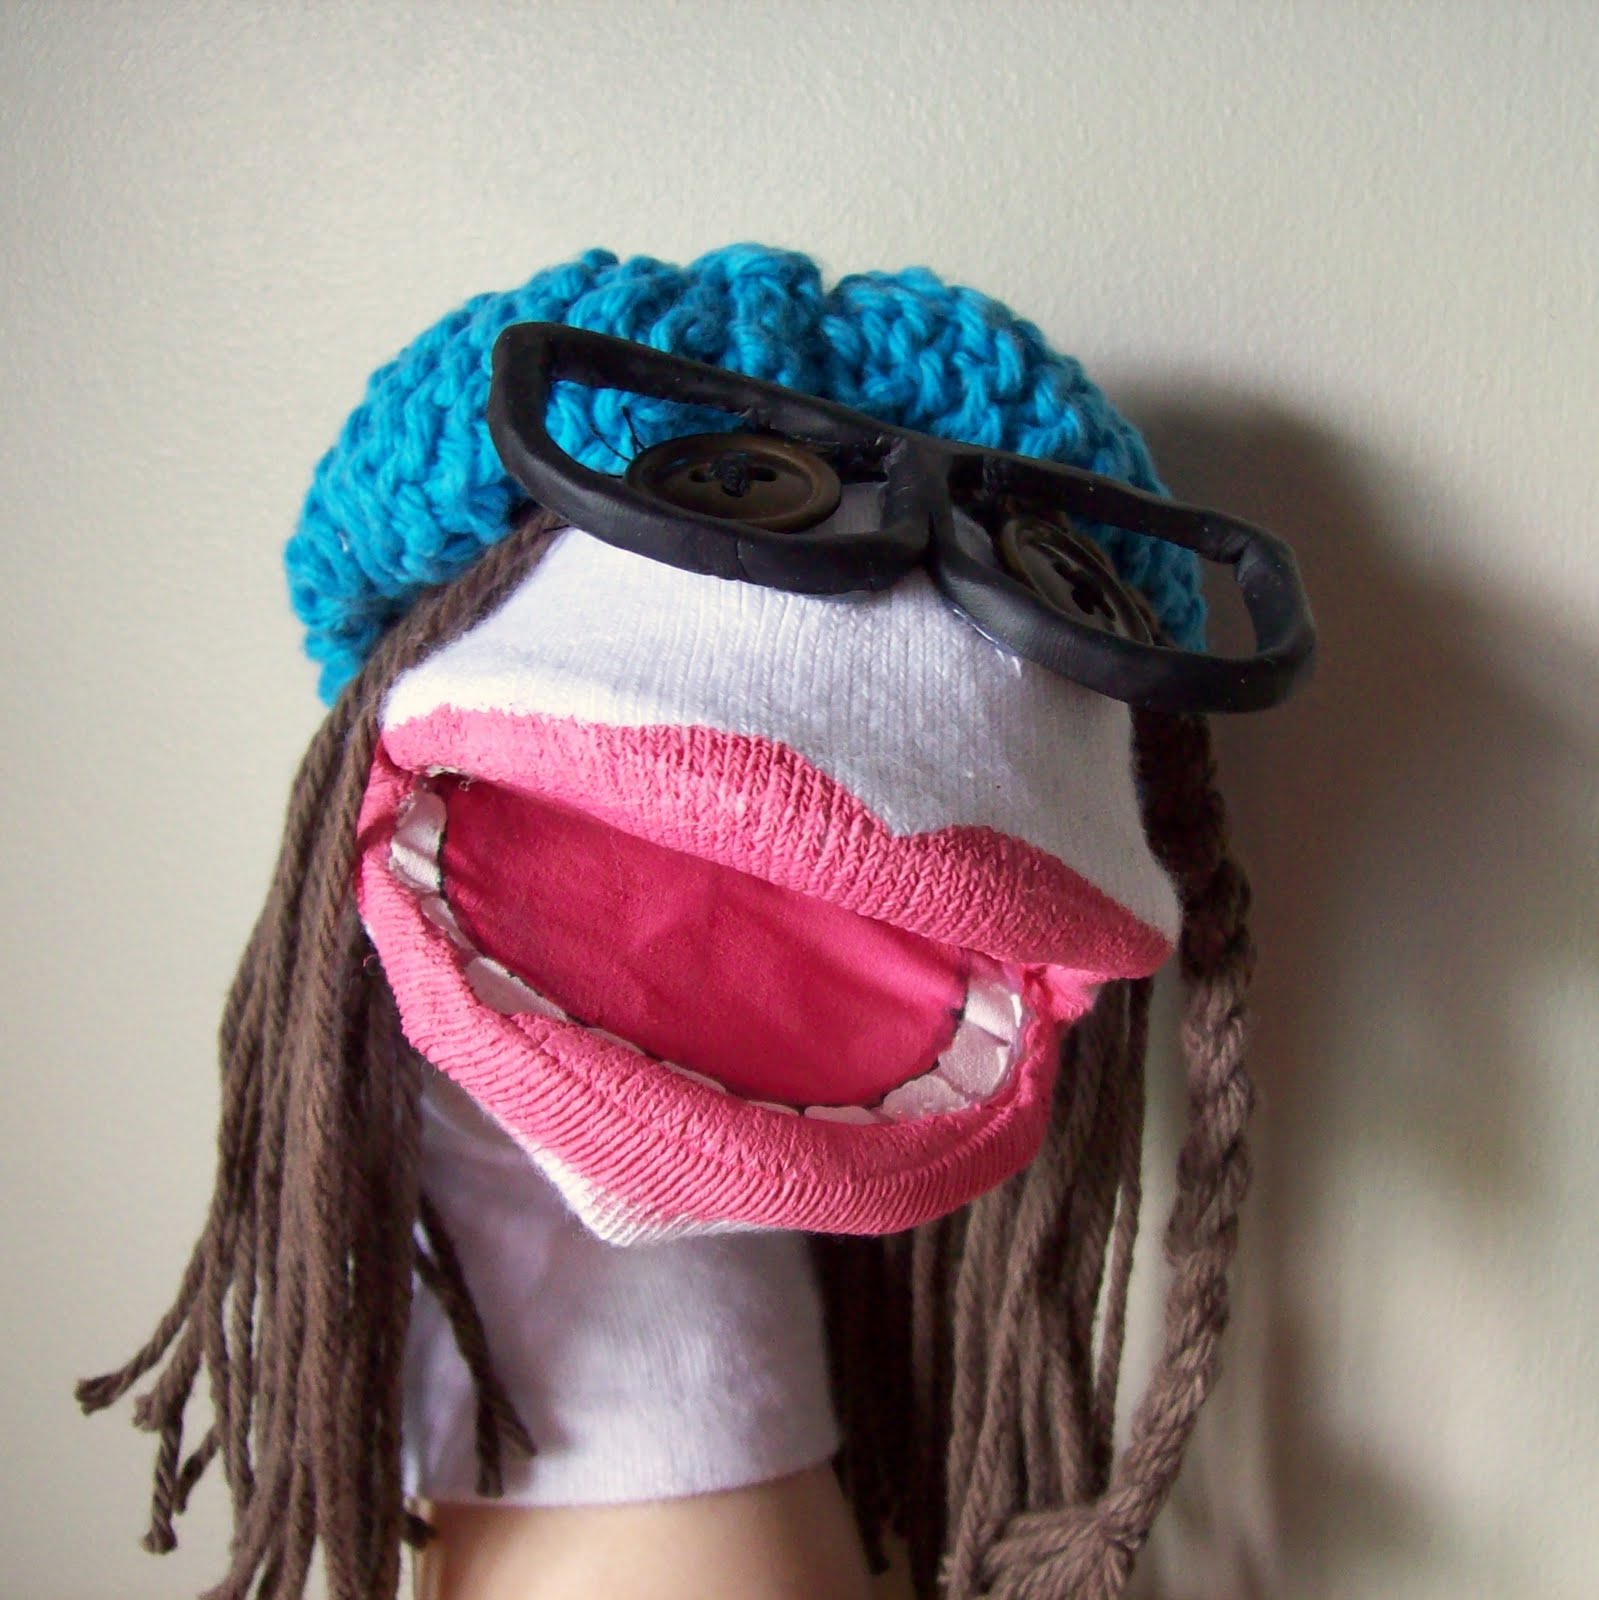
After finishing the mouth the next thing I did was giver her some eyes. Though you can't really see them very well I marked where the eyes should go with two dots from a green colored pencil. I had the puppet on my hand when I marked them since I figured it would be more accurate than marking them with the puppet flat.

After marking where the eyes should go I sewed on buttons the traditional way. I used brown buttons and black thread, I figured the black would be the closest equivalent to an eyes iris. This is what it looked like on the inside:


This is how it looks so far with an actual human hand (my desk is typically a mess, I make no apologies. It's my desk.):

I did the glasses next with some premo sculpey clay I had lying around (I had bought it ages ago when it was on sale and hadn't done anything with it). I figured I'd start with making a pattern to cut the shape out of a slab of clay. I'd done that sort of thing with ceramic clay and had it work. I did not have the same result with this, it's a much harder clay and not a very good consistancy for smoothing after some of the rough lines created by cutting. So while I started with this:


After baking and cooling the glasses I attached it to the puppet using my hot glue gun. I put something in the sock to hold the face out instead of leaving it flat so it wouldn't look weird when worn and so my hand wouldn't get burnt from hot glue. All that's left to do for her is hair, a hat and her ukulele.

I made Ms. Michaelsock's hat by knitting a square and using a running stitch with the same yarn on the outer edge of the square and gathering it. It's similar to what you would do if you were making a fabric yo-yo. I don't know that that makes complete sense. A different way of doing it would be to hot glue the square to itelf while making it rounded and kind of poofy. I actually used a combination of both techniques.

I made the hair by guestimating the correct length. I made an X with two lengths of yarn and then secured the yarn hairs together by alternating and tying threads through the two middles of the X.

I then braided a piece of yarn and hot glued it to the top of the puppet to make her hair more interesting that just a long bunch of hanging yarn.

After that I glued the main piece on like so:

And then the finished hat got glued on as well.

I had thought of leaving it like that and calling it good but I felt there was a way to make it better. So, I used some gold and black Premo Sculpey I already had to make her a ukulele. Character is in the accessories after all.
I started with a rolled out oval shape like this:

Then I basically squeezed it with my fingers, pulled the neck out and poked it a bit. Probably slapped it around too. After all that abuse I ended up with this:

Then I added black accents and some wire I had laying around. The knobby bits on there were made with four little pieces of wire with some tear dropped little pieces of clay stuck into them which were in turn stuck into the neck of the uke. After about 40 minutes of baking the uke was finished, I hot glued a circle of elastic on the back of it so I could wear it bracelet style with the puppet.

And, voila! Le Ingrid Michaelsock. (Please excuse my lack of accent marks, I don't know how to do them in this program thingy and I'm too lazy to figure it out. Otherwise I'd just use a different word/phrase and skip the pseudo French usage altogether. I don't know French anyway.)
